React组件化开发
React 的组件化
类组件
类组件的定义有如下要求:
- 组件的名称是大写字符开头(无论类组件还是函数组件)
- 类组件需要继承自
React.Component - 类组件必须实现
render函数
::: tip super(props),super()以及不写 super 的区别
- 如果用到了
constructor就必须写super(),是用来初始化this的 - 如果你在
constructor中要使用this.props,就必须给super加参数:super(props) - 无论有没有
constructor,在render中this.props都是可以使用的,这是 React 默认实现的 - 如果没用到
constructor,是可以不写的;React 会默认添加一个空的constructor。
:::
使用 class 定义一个组件:
constructor是可选的,我们通常在constructor中初始化一些数据this.state中维护的就是我们组件内部的数据render()方法是class组件中唯一必须实现的方法
import { Component } from 'react'

export default class App extends Component {
  constructor() {
    super()
    this.state = {
      msg: '我是app组件',
    }
  }
  render() {
    return <div>{this.state.msg},啊这</div>
  }
}
函数组件
函数组件是使用 function 来进行定义的函数,只是这个函数会返回和类组件中render函数返回一样的内容
特点:
- 没有生命周期,也会被更新并挂载,但是没有生命周期函数
- 没有
this(组件实例) - 没有内部状态
state
定义函数组件:
export default function App() {
  return <div>我是function组件</div>
}
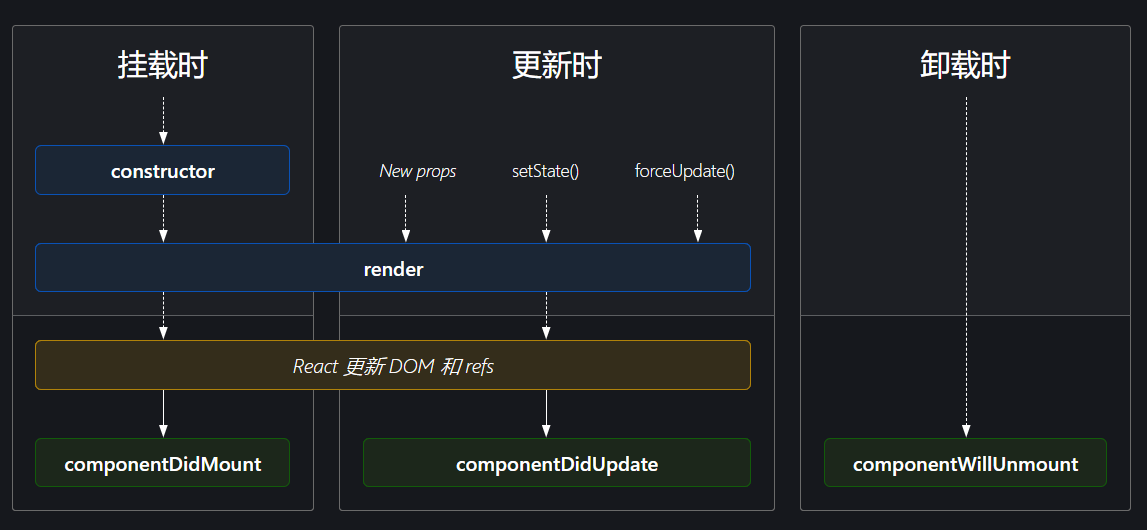
生命周期
React 内部为了告诉我们当前处于哪些阶段,会对我们组件内部实现的某些函数进行回调,这些函数就是生命周期函数:
componentDidMount函数:组件已经挂载到DOM上时,就会回调componentDidUpdate函数:组件已经发生了更新时,就会回调componentWillUnmount函数:组件即将被移除时,就会回调- 我们可以在这些回调函数中编写自己的逻辑代码,来完成自己的需求功能
*我们说到
React生命周期时,主要谈的是类的生命周期,因为函数式组件是没有生命周期函数的
常用生命周期函数
Constructor
constructor 中通常只做两件事情:
- 通过给
this.state赋值对象来初始化内部的state - 为事件绑定实例
this:this.xxx.bind(this)
componentDidMount
componentDidMount()会在组件挂载后(插入 DOM 树中)立即调用
componentDidMount中通常进行:
- 依赖于
DOM的操作可以在这里进行 - 在此处发送网络请求就最好的地方(官方建议)
- 可以在此处添加一些订阅(在
componentWillUnmount取消订阅)
componentDidUpdate
componentDidUpdate() 会在更新后会被立即调用,首次渲染不会执行此方法
- 当组件更新后,可以在此处对
DOM进行操作 - 如果你对更新前后的
props进行了比较,也可以选择在此处进行网络请求(例如,当props未发生变化时,则不会执行网络请求)
componentDidUpdate(prevProps) {
  // 典型用法(不要忘记比较 props):
  if (this.props.userID !== prevProps.userID) {
    this.fetchData(this.props.userID);
  }
}
componentWillUnmount
componentWillUnmount() 会在组件卸载及销毁之前直接调用
- 在此方法中执行必要的清理操作
- 例如,清除
timer,取消网络请求或清除在componentDidMount()中创建的订阅(events?)
组件间的通信
父组件传递子组件
父组件在展示子组件,可能会传递一些数据给子组件:
- 父组件通过属性=值的形式来传递给子组件数据;
- 子组件通过
props参数获取父组件传递过来的数据;
::: details 父传子:类组件
import { Component } from 'react'

class ChildCom extends Component {
  render() {
    const { name } = this.props
    return <div>{`我的名字是${name}`}</div>
  }
}

export default class App extends Component {
  constructor() {
    super()
    this.state = {
      name: 'frank',
    }
  }
  render() {
    return (
      <div>
        <ChildCom name={this.state.name}></ChildCom>
      </div>
    )
  }
}
:::
::: details 父传子:函数组件
import { Component } from 'react'

function ChildCom(props) {
  const { name } = props
  return <h2>{`我的名字是${name}`}</h2>
}

export default class App extends Component {
  render() {
    return (
      <div>
        <ChildCom name="frank"></ChildCom>
      </div>
    )
  }
}
:::
参数校验证 propTypes
对于传递给子组件的数据,有时候我们可能希望进行验证,那么就需要使用propTypes
更多的验证方式,可以参考官网
- 比如验证数组,并且数组中包含哪些元素;
- 比如验证对象,并且对象中包含哪些
key以及value是什么类型; - 比如某个
prop是必须的,使用requiredFunc: PropTypes.func.isRequired
如果没有传递,我们希望有默认值呢?我们使用 defaultProps就可以了
import { Component } from 'react'
import PropTypes from 'prop-types'

class ChildCom extends Component {
  render() {
    const { name, age } = this.props
    return <div>{`我的名字是${name},今年${age}岁了`}</div>
  }
}

ChildCom.propTypes = {
  name: PropTypes.string.isRequired,
  age: PropTypes.number.isRequired,
}

ChildCom.defaultProps = {
  name: 'null',
  age: 0,
}

export default class App extends Component {
  render() {
    return (
      <div>
        <ChildCom name="frank" age={22}></ChildCom>
        <ChildCom age={24}></ChildCom>
        <ChildCom></ChildCom>
      </div>
    )
  }
}
import { Component } from 'react'
import PropTypes from 'prop-types'

class ChildCom extends Component {
  static propTypes = {
    name: PropTypes.string.isRequired,
    age: PropTypes.number.isRequired,
  }
  static defaultProps = {
    name: 'null',
    age: 0,
  }
  render() {
    const { name, age } = this.props
    return <div>{`我的名字是${name},今年${age}岁了`}</div>
  }
}

export default class App extends Component {
  render() {
    return (
      <div>
        <ChildCom name="frank" age={22}></ChildCom>
        <ChildCom age={24}></ChildCom>
        <ChildCom></ChildCom>
      </div>
    )
  }
}
如果你在常规开发中使用函数组件,那你可能需要做一些适当的改动,以保证 PropsTypes应用正常。
export default function HelloWorldComponent({ name }) {
  return <div>Hello, {name}</div>
}
如果要添加PropTypes,你可能需要在导出之前以单独声明的一个函数的形式,声明该组件,具体代码如下:
function HelloWorldComponent({ name }) {
  return <div>Hello, {name}</div>
}

export default HelloWorldComponent
接着,可以直接在 HelloWorldComponent 上添加 PropTypes:
import PropTypes from 'prop-types'

function HelloWorldComponent({ name }) {
  return <div>Hello, {name}</div>
}

HelloWorldComponent.propTypes = {
  name: PropTypes.string,
}

export default HelloWorldComponent
子组件传递父组件
在 React 中是通过 props 传递消息,只是让父组件给子组件传递一个回调函数,在子组件中调用这个函数即可;
::: details 子传父
import React, { Component } from 'react'

class Ibutton extends Component {
  constructor() {
    super()
    this.state = {
      age: 22,
    }
  }

  render() {
    return (
      <div>
        <button
          onClick={() => {
            this.props.increment(this.state.age)
          }}
        >
          传递
        </button>
      </div>
    )
  }
}

export default class App extends Component {
  constructor() {
    super()
    this.state = {
      age: 0,
    }
  }

  render() {
    return (
      <div>
        <h1>{this.state.age}</h1>
        <Ibutton
          increment={(value) => {
            this.increment(value)
          }}
        />
      </div>
    )
  }

  increment(value) {
    this.setState({ age: value })
  }
}
:::
在 React 中实现 slot
children(即:标签(组件)内的内容)被默认添加到props上,可以通过this.props.children访问,如果存在多个children,那么被添加到props上的是一个children数组
import { Component } from 'react'

import NavBar from './NavBar'
import NavBar2 from './NavBar2'

export default class App extends Component {
  render() {
    return (
      <div>
        <NavBar>
          <div>aaa</div>
          <div>bbb</div>
          <div>ccc</div>
        </NavBar>
        <NavBar2
          leftSlot={<div>aaa</div>}
          centerSlot={<div>bbb</div>}
          rightSlot={<div>ccc</div>}
        ></NavBar2>
      </div>
    )
  }
}
import { Component } from 'react'

export default class NavBar extends Component {
  render() {
    const { children } = this.props
    return (
      <div className="nav">
        <div className="nav_item nav_left">{children[0]}</div>
        <div className="nav_item nav_center">{children[1]}</div>
        <div className="nav_item nav_right">{children[2]}</div>
      </div>
    )
  }
}
import { Component } from 'react'

export default class NavBar extends Component {
  render() {
    const { leftSlot, centerSlot, rightSlot } = this.props
    return (
      <div className="nav">
        <div className="nav_item nav_left">{leftSlot}</div>
        <div className="nav_item nav_center">{centerSlot}</div>
        <div className="nav_item nav_right">{rightSlot}</div>
      </div>
    )
  }
}

跨组件通信 Context
Context 应用场景
非父子组件数据的共享:
- 在开发中,比较常见的数据传递方式是通过
props属性自上而下(由父到子)进行传递 - 但是对于有一些场景:比如一些数据需要在多个组件中进行共享
- 如果我们在顶层的
App中定义这些信息,之后一层层传递下去,那么对于一些中间层不需要数据的组件来说,是一种冗余的操作
但是,如果层级更多的话,一层层传递是非常麻烦,并且代码是非常冗余的:
React提供了一个API:ContextContext提供了一种在组件之间共享此类值的方式,而不必显式地通过组件树的逐层传递propsContext设计目的是为了共享那些对于一个组件树而言是“全局”的数据
Context 相关 API
React.createContext
- 创建一个需要共享的
Context对象 - 当
React渲染一个订阅了这个Context对象的组件,这个组件会从离自身最近的那个匹配的Provider中读取到当前的context值 - 当组件没有匹配到
Provider时,其defaultValue参数才会生效(只要匹配到就不会生效,即使不传递 value)
const MyContext = React.createContext({ nickName: 'null', level: 0 }//默认值)
Context.Provider
- 每个
Context对象都会返回一个Provider React组件,它允许消费组件订阅context的变化 Provider接收一个value属性,传递给消费组件- 一个
Provider可以和多个消费组件有对应关系 - 多个
Provider也可以嵌套使用,里层的会覆盖外层的数据(如需使用多个context请使用Context.Consumer) - 当
Provider的value值发生变化时,它内部的所有消费组件都会重新渲染
    render() {
        return (
            <div>
                <MyContext.Provider value={this.state}>
                 {/*这是子组件(消费组件)*/}
                    <List></List>
                </MyContext.Provider>
            </div>
        )
    }
- 从 Provider 到其内部消费组件的传播不受制于
shouldComponentUpdate函数,因此当消费组件在其祖先组件跳过更新的情况下也能更新:
import { PureComponent, Component } from 'react'
import React from 'react'
// 创建context对象
const MyContext = React.createContext({
  nickName: 'null',
  level: 0,
  color: 'red',
})

class List extends Component {
  render() {
    console.log('list render')
    return (
      <div>
        <UserInfo />
        <ul>
          <li>首页</li>
          <li>购物车</li>
          <li>我的</li>
        </ul>
      </div>
    )
  }

  // context不受shouldComponentUpdate的控制
  shouldComponentUpdate(nextProps, nextState) {
    return false
  }
}

// userInfo 组件
class UserInfo extends Component {
  render() {
    console.log('render,userinfo')
    return (
      <div>
        <h1 style={{ color: this.context.color }}>
          {this.context.nickName},等级{this.context.level}
        </h1>
      </div>
    )
  }

  shouldComponentUpdate(nextProps, nextState) {
    return false
  }
}

// 挂载contextType(这是无法使用多个context的原因)
UserInfo.contextType = MyContext

export default class App extends Component {
  constructor() {
    super()
    this.state = { nickName: 'frank', level: 1212299, color: 'red' }
  }

  render() {
    console.log('app render')
    return (
      <div>
        <MyContext.Provider value={this.state}>
          <List />
        </MyContext.Provider>
      </div>
    )
  }

  shouldComponentUpdate(nextProps, nextState) {
    return false
  }
}
Class.contextType
::: warning 注意 函数式组件无法使用Class.contextType :::
- 挂载在
class上的contextType属性会被赋值为一个由React.createContext()创建的Context对象 - 这能让你使用
this.context来消费最近Context上的那个值 - 你可以在任何生命周期中访问到它,包括
render函数中
UserInfo.contextType = MyContext
// 这是孙组件
class UserInfo extends Component {
  render() {
    return (
      <div>
        <h2 style={{ color: this.context.color }}>
          用户名:{this.context.nickName}
        </h2>
        <h2>等级:{this.context.level}</h2>
      </div>
    )
  }
}
Context.Consumer 现在建议使用useContext进行消费
::: tip 什么时候使用 Context.Consumer 呢?
- 当使用
value的组件是一个函数式组件时 - 或者当组件中需要使用多个
Context时
:::
这里需要函数作为子元素function as child这种做法;传递给函数的 value 值等价于组件树上方离这个 context 最近的 Provider 提供的 value 值
function UserInfo() {
  return (
    <MyContext.Consumer>
      {(value) => {
        return (
          <div>
            <h2>用户名:{value.nickName}</h2>
            <h2>等级:{value.level}</h2>
          </div>
        )
      }}
    </MyContext.Consumer>
  )
}
多个 Context
:::details 具体编码
import { Component } from 'react'

// 创建context对象
const MyContext = React.createContext({ nickName: 'null', level: 0 })
const themeContext = React.createContext()

function List() {
  return (
    <div>
      <UserInfo></UserInfo>
      <ul>
        <li>首页</li>
        <li>购物车</li>
        <li>我的</li>
      </ul>
    </div>
  )
}

function UserInfo() {
  return (
    <MyContext.Consumer>
      {(value) => {
        return (
          <themeContext.Consumer>
            {(theme) => {
              return (
                <div>
                  <h2 style={{ color: theme.color }}>
                    用户名:{value.nickName}
                  </h2>
                  <h2>等级:{value.level}</h2>
                </div>
              )
            }}
          </themeContext.Consumer>
        )
      }}
    </MyContext.Consumer>
  )
}

export default class App extends Component {
  constructor() {
    super()
    this.state = {
      nickName: 'frank',
      level: 99,
    }
  }
  render() {
    return (
      <div>
        <MyContext.Provider value={this.state}>
          <themeContext.Provider value={{ color: 'blue' }}>
            <List></List>
          </themeContext.Provider>
        </MyContext.Provider>
      </div>
    )
  }
}
:::
全局事件传递
前面通过 Context 主要实现的是数据的共享,但是在开发中如果有跨组件之间的事件传递,应该如何操作呢?
- 在 Vue 中我们可以通过 Vue 的实例,快速实现一个事件总线(EventBus),来完成操作
- 在 React 中,我们可以依赖一个使用较多的库 events 来完成对应的操作
安装:yarn add events
events 常用的 API:
- 创建 EventEmitter 对象:const eventBus =new EventEmitter()
- 触发事件:eventBus.emit("事件名称", 参数列表)
- 订阅事件:eventBus.addListener("事件名称", 监听函数)
- 移除事件:eventBus.removeListener("事件名称", 监听函数)
::: details events 案例
import { Component } from 'react'
import { EventEmitter } from 'events'

const eventBus = new EventEmitter()

class Main extends Component {
  render() {
    return (
      <div>
        <MainBanner />
      </div>
    )
  }
}

class MainBanner extends Component {
  constructor() {
    super()
    this.state = {
      num: 0,
    }
  }

  render() {
    return <div>{this.state.num}</div>
  }

  componentDidMount() {
    eventBus.addListener('helloMainBanner', (num, num2) => {
      this.setState({
        num,
      })
      console.log(num, num2)
    })
  }

  componentWillUnmount() {
    // 取消订阅
    eventBus.removeListener('helloMainBanner')
  }
}

export default class App extends Component {
  constructor() {
    super()
    this.state = {
      num: 88888,
    }
  }

  render() {
    return (
      <div>
        <Main />
        <button onClick={this.helloMainBanner.bind(this)}>
          helloMainBanner
        </button>
      </div>
    )
  }

  helloMainBanner() {
    eventBus.emit('helloMainBanner', this.state.num, 123)
  }
}
:::
setState 类组件
为什么使用 SetState
开发中我们并不能直接通过修改 state 的值来让界面发生更新:
- 因为我们修改了
state之后,希望React根据最新的State来重新渲染界面,但是这种方式的修改React并不知道数据发生了变化 React并没有实现类似于Vue2中的Object.defineProperty或者Vue3中的Proxy的方式来监听数据的变化- 我们必须通过
setState来告知React数据已经发生了变化
在组件中并没有实现 setState 的方法,为什么可以调用呢? 原因很简单,setState 方法是从 Component 中继承过来的
Component.prototype.setState = function (partialState, callback) {
  // ...
  // React源🐎
}
setState 异步更新
setState 的更新是异步的?
import { Component } from 'react'

export default class App extends Component {
  constructor() {
    super()
    this.state = {
      message: 'hello',
    }
  }

  render() {
    return (
      <div>
        <h2>{this.state.message}</h2>
        <button onClick={this.handleClick.bind(this)}>改变文本</button>
      </div>
    )
  }

  handleClick() {
    this.setState({
      message: 'hello,world',
    })
    console.log(this.state.message) // hello
  }
}
- 最终打印结果是
hello - 可见
setState是异步的操作,我们并不能在执行完setState之后立马拿到最新的state的结果
为什么 setState 设计为异步呢?
setState设计为异步,可以显著的提升性能:如果每次调用setState都进行一次更新,那么意味着render函数会被频繁调用,界面重新渲染,这样效率是很低的;最好的办法应该是获取到多个更新,之后进行批量更新- 如果同步更新了
state,但是还没有执行render函数,那么state和props不能保持同步。state和props不能保持一致性,会在开发中产生很多的问题
如何获取异步的结果
方式一:setState 的回调
setState接受两个参数:第二个参数是一个回调函数,这个回调函数会在更新后会执行- 格式如下:
setState(partialState, callback)
    handleClick() {
        this.setState(
            {
                message: 'hello,world',
            },
            () => {
                console.log(this.state.message)
            }
        )
方式二:生命周期函数componentDidUpdate
    componentDidUpdate(prevProps, prevState) {
        console.log('componentDidUpdate', this.state.message)
    }
setState 一定是异步吗?
- 在组件生命周期或
React合成事件中,setState是异步的 - 在
setTimeout或者原生dom事件中,setState是同步的
数据的合并
当调用setState时,并不会覆盖之前的state,React底层通过Object.assign进行合并
比如:{name:'zhang',age:23},修改 age 并不会对 name 造成影响
this.state = {
  name: 'frank',
  age: 23,
}
// 使用setState改变age
this.setState({
  age: 24,
})
// 底层调用:Object.assign({},prevState,partialStatte)
// 即相当于:
Object.assign({}, { name: 'zhang', age: 23 }, { age: 24 })
多个 state 的合并
如下代码,count并不会累加,后调用的 setState() 将覆盖同一周期内先调用 setState 的值,因此count只增加 1。
this.setState({
    count: this.state.count + 1,
})
this.setState({
    count: this.state.count + 1,
})
this.setState({
    count: this.state.count + 1,
})
//    相当于:
Object.assign(
  previousState,
  {count:this.state.count + 1},
  {count:this.state.count+ 1},
  ...
)
如果后续状态取决于当前状态,可以使用updater函数的形式代替:
this.setState((state) => {
  return {
    num: state.num + 1,
  }
})
this.setState((state) => {
  return {
    num: state.num + 1,
  }
})
this.setState((state) => {
  return {
    num: state.num + 1,
  }
})
// +3
React 的更新机制
react的渲染流程
st=>start: jsx
p=>operation: 虚拟DOM
e=>end: 真实DOM

st->p->e
react的更新流程
st=>start: props/state的改变
p=>operation: 重新执行render函数
q=>operation: 产生新的虚拟DOM
r=>operation: 新旧虚拟DOM进行diff
s=>operation: 计算出差异进行更新
t=>end: 更新到真实的DOM

st->p->q->r->s->t
React 性能优化
列表中 keys 的作用
在遍历列表时,总是会提示一个警告,让我们加入一个key属性
方式一:在最后位置插入数据
这种情况,有无 key 意义并不大
方式二:在前面插入数据
<ul>
<li key='333'>333</li>
<li key='111'>111</li>
<li key='222'>222</li>
</ul>
- 这种做法,在没有
key的情况下,列表中所有的子元素都需要进行修改 - 当子元素拥有
key时,React使用key来匹配原有树上的子元素以及最新树上的子元素,key为 111 和 222 的元素仅仅进行位移,不需要进行任何的修改;将key为 333 的元素插入到最前面的位置即可
key 的注意事项
key应该是唯一的key不要使用随机数(随机数在下一次render时,会重新生成一个数字)- 使用
index作为key,对性能是没有优化的
shouldComponentUpdate
只要是修改了 App 中的数据,所有的组件都需要重新 render,进行 diff 算法,性能必然是很低的
事实上,很多的组件没有必须要重新 render;它们调用 render 应该有一个前提,就是依赖的数据(state、 props)发生改变时,再调用自己的 render 方法
通过 shouldComponentUpdate 方法可以控制 render 方法是否被调用
该方法有两个参数:
- 参数一:
nextProps:修改之后最新的 props 属性 - 参数二:
nextState:修改之后最新的 state 属性
该方法返回值是一个 boolean 类型:
- 返回值为
true,那么就需要调用render方法 - 返回值为
false,那么就不需要调用render方法 - 默认返回的是
true,也就是只要state发生改变,就会调用render方法
PureComponent
如果所有的类,我们都需要手动来实现 shouldComponentUpdate,这样做是很麻烦的
事实上 React 已经考虑到了这一点,所以 React 已经默认帮我们实现好了, 将class继承自 PureComponent即可
import { PureComponent } from 'react'

export default class App extends PureComponent {
  constructor(props) {
    super(props)
    this.state = {
      movie: ['流浪地球', '长津湖', '信条', '肖生客的救赎'],
    }
  }
  // shouldComponentUpdate实现
  // shouldComponentUpdate(nextProps, nextState) {
  //     return nextState.movie !== this.state.movie
  // }

  render() {
    return (
      <div>
        <ul>
          {this.state.movie.map((item) => {
            return <li>{item}</li>
          })}
        </ul>
        <button onClick={this.add.bind(this)}>++++</button>
      </div>
    )
  }

  add() {
    // 直接修改数据
    this.state.movie.push('奇迹笨小孩')
    this.setState({
      movie: this.state.movie,
    })
    // 正确做法(新数据替换旧数据)
    // this.setState({
    //     movie: [...this.state.movie,'奇迹笨小孩'],
    // })
  }
}
当点击按钮时,电影列表并没有更新。问题在于 PureComponent 仅仅会对新老 this.state.movie 的值进行浅层比较。由于代码中 add 方法改变了同一个 movie 数组,使得新老 this.state.movie 比较的其实还是同一个数组。即便实际上数组中的内容已经变了,但是比较结果是相同的。 所以不可变性在 React 中非常重要
高阶组件 memo
如何让函数组件实现和PureComponent相同的功能呢?此时需要使用一个高阶组件 memo,memo 仅检查 props 的变更
import { Component, memo, PureComponent } from 'react'

// header
const MemoHeader = memo(function Header() {
  console.log('header')
  return <div>这是header</div>
})

// main
class Main extends PureComponent {
  render() {
    console.log('main')
    return (
      <div>
        <MainBanner />
        <MainProductList />
      </div>
    )
  }
}

//  main banner
function MainBanner() {
  console.log('mainbanner')
  return <div>轮播图组件</div>
}

// main productList
function MainProductList() {
  console.log('mainproductlist')
  return (
    <ul>
      <li>1</li>
      <li>2</li>
      <li>3</li>
    </ul>
  )
}

// footer
function Footer() {
  console.log('footer')
  return <div>这是footer组件</div>
}

export default class App extends Component {
  constructor() {
    super()
    this.state = {
      num: 0,
    }
  }

  render() {
    console.log('app')
    return (
      <div>
        <MemoHeader />
        <Main />
        <Footer />
        {this.state.num}
        <button onClick={this.numplus.bind(this)}>num+++</button>
      </div>
    )
  }

  numplus() {
    this.setState({
      num: this.state.num + 1,
    })
  }
}
header 组件使用 memo 进行了包裹,而 footer 组件没有
当我们改变 APP 中的 num 的值时,footer 组件重新 render 了,而 header 组件并没有重新 renderMainBanner、MainProductList 组件没有使用 memo 进行包裹,为什么也没有重新 render?他们的父组件 Main 继承自 PureComponent
refs
在 React 的开发模式中,通常情况下不需要、也不建议直接操作 DOM,但是某些特殊的情况,确实需要获取到 DOM 进行某些操作
如何创建 refs 来获取对应的 DOM 呢?目前有三种方式:
方式一已废弃:
传入字符串,使用时通过 this.refs 传入的字符串格式获取对应的元素方式二推荐:传入一个对象,对象是通过
React.createRef()方式创建出来的;使用时获取到创建的对象其中有一个current属性就是对应的元素方式三:传入一个函数,该函数会在
DOM被挂载时进行回调,这个函数会传入一个元素对象,我们可以自己保存
ref 的值根据节点的类型而有所不同:
当
ref属性用于HTML元素时,构造函数中使用React.createRef()创建的ref接收底层DOM元素作为其current属性当
ref属性用于自定义类·组件时,ref对象接收组件的挂载实例作为其current属性你不能在函数组件上使用
ref属性,因为他们没有实例
class App extends React.Component {
  constructor() {
    super()
  }

  render() {
    return (
      <div>
        <div ref="message">hello,react</div>
        <button onClick={this.changeText.bind(this)}>改变文本</button>
      </div>
    )
  }

  changeText() {
    this.refs.message.innerHTML = 'hello,frank'
  }
}
class App extends React.Component {
  constructor() {
    super()
    this.textRef = React.createRef()
  }

  render() {
    return (
      <div>
        <div ref={this.textRef}>hello,react</div>
        <button onClick={this.changeText.bind(this)}>改变文本</button>
      </div>
    )
  }

  changeText() {
    this.textRef.current.innerHTML = 'hello,zhang'
  }
}
class App extends React.Component {
  constructor() {
    super()
    this.textRef = null
  }

  render() {
    return (
      <div>
        <div
          ref={(args) => {
            this.textRef = args
          }}
        >
          hello,react
        </div>
        <button onClick={this.changeText.bind(this)}>改变文本</button>
      </div>
    )
  }

  changeText() {
    this.textRef.innerHTML = 'hello,girl'
  }
}
ref 的转发 函数式组件推荐使用useRef
如果要在函数组件中使用 ref,你可以使用 forwardRef来转发ref
不管怎样,你可以在函数组件内部使用 ref 属性,只要它指向一个 DOM 元素或 class 组件:
::: details
import { createRef, forwardRef, PureComponent } from 'react'

const EnHome = forwardRef(function Home(props, ref) {
  return (
    <div ref={ref}>
      <h1>我是Home</h1>
    </div>
  )
})
export default class App extends PureComponent {
  constructor() {
    super()
    this.myRef = createRef()
  }

  render() {
    return (
      <div>
        <EnHome ref={this.myRef} copName={'fuck'} />
      </div>
    )
  }

  componentDidMount() {
    console.log(this.myRef.current)
  }
}
:::
React 表单处理
注意点
select:React并不会使用selected属性,而是在根select标签上使用value属性,表示默认选中- 处理多个输入官网案例注意
checkbox的处理逻辑
// TODO : change there
高阶组件
- 首先, 高阶组件本身不是一个组件,而是一个函数;其次,这个函数的参数是一个组件,返回值也是一个组件
- 高阶组件并不是 React API 的一部分,它是基于 React 的组合特性而形成的设计模式
- 用途:
应用 1:props 的增强
不修改原有代码的情况下,添加新的 props:
::: details code
import { PureComponent } from 'react'

function enhanceProps(Comp, otherProps) {
  return (props) => <Comp {...props} {...otherProps} />
}

class Home extends PureComponent {
  render() {
    return (
      <div>
        昵称:{this.props.nickName},等级:{this.props.level},区域:
        {this.props.region}
      </div>
    )
  }
}

class About extends PureComponent {
  render() {
    return (
      <div>
        昵称:{this.props.nickName},等级:{this.props.level},区域:
        {this.props.region}
      </div>
    )
  }
}

const EnhanceHome = enhanceProps(Home, { region: 'china' })
const EnhanceAbout = enhanceProps(About, { region: 'US' })

export default class App extends PureComponent {
  render() {
    return (
      <div>
        <EnhanceHome nickName="frank" level="999" />
        <EnhanceAbout nickName="zhang" level="1" />
      </div>
    )
  }
}
:::
利用高阶组件来共享 Context:
::: details code
import { createContext, PureComponent } from 'react'

//创建context

const UserContext = createContext()

//定义高阶组件

function withUser(Comp) {
  return (props) => {
    return (
      <UserContext.Consumer>
        {(value) => {
          return <Comp {...value} {...props} />
        }}
      </UserContext.Consumer>
    )
  }
}

class Home extends PureComponent {
  render() {
    return (
      <div>
        昵称:{this.props.nickName},等级:{this.props.level},区域:
        {this.props.region}
      </div>
    )
  }
}

class About extends PureComponent {
  render() {
    return (
      <div>
        昵称:{this.props.nickName},等级:{this.props.level},区域:
        {this.props.region}
      </div>
    )
  }
}

const EnhanceHome = withUser(Home)
const EnhanceAbout = withUser(About)

export default class App extends PureComponent {
  render() {
    return (
      <div>
        <UserContext.Provider
          value={{ nickName: 'frank', level: '999', region: 'CN' }}
        >
          <EnhanceHome />
          <EnhanceAbout />
        </UserContext.Provider>
      </div>
    )
  }
}
:::
应用 2:渲染判断鉴权
在开发中,我们可能遇到这样的场景:
- 某些页面是必须用户登录成功才能进行进入
- 如果用户没有登录成功,那么直接跳转到登录页面;
这个时候,我们就可以使用高阶组件来完成鉴权操作:
应用 3:生命周期劫持
利用高阶函数来劫持生命周期,在生命周期中完成自己的逻辑:
::: details code
import { PureComponent } from 'react'

function handleRenderTime(Cop) {
  return class RenderTimeCop extends PureComponent {
    UNSAFE_componentWillMount() {
      this.beginTime = new Date().getTime()
    }

    componentDidMount() {
      this.endTime = new Date().getTime()
      const renderTime = this.endTime - this.beginTime
      console.log(this.props.copName + '组件渲染用了' + renderTime + 'ms')
    }

    // props 转发下层
    /**
     * 高阶组件==> 返回 Xxxx  组件 ===> 返回了组件
     */
    render() {
      return <Cop {...this.props} />
    }
  }
}

class Home extends PureComponent {
  render() {
    return (
      <div>
        <p>{19999999999999999999999999999999999 * 123}</p>
        <p>
          asdaskdnasndjasndjaasndjasndjaasndjasndjaasndjasndjaasndjasndjaasndjasndjaasndjasndjaasndjasndjaasndjasndjaasndjasndjaasndjasndjaasndjasndjaasndjasndjaasndjasndjaasndjasndjaasndjasndjaasndjasndjaasndjasndjaasndjasndjaasndjasndjasndjasndjasndjasnsjdnjnjasn
        </p>
      </div>
    )
  }
}

class About extends PureComponent {
  constructor() {
    super()
    this.state = {
      table: [
        {
          word: '海底捞',
          count: 9816,
          user: 8972,
        },
        {
          word: '成都',
          count: 8988,
          user: 8437,
        },
        {
          word: '炭烤',
          count: 9876,
          user: 7622,
        },
        {
          word: '常州',
          count: 9595,
          user: 6981,
        },
        {
          word: '麦乐鸡',
          count: 8136,
          user: 5779,
        },
        {
          word: '上海',
          count: 6789,
          user: 5677,
        },
        {
          word: '苏州',
          count: 8070,
          user: 5261,
        },
        {
          word: '沈阳',
          count: 8266,
          user: 4925,
        },
        {
          word: '大连',
          count: 8407,
          user: 4819,
        },
        {
          word: '水果',
          count: 6137,
          user: 4769,
        },
        {
          word: '商超',
          count: 7251,
          user: 4393,
        },
        {
          word: '面条',
          count: 8320,
          user: 4188,
        },
        {
          word: '广州',
          count: 6525,
          user: 4184,
        },
        {
          word: '麦当劳',
          count: 6927,
          user: 3820,
        },
        {
          word: '杭州',
          count: 5505,
          user: 3377,
        },
        {
          word: '呼和浩特',
          count: 6687,
          user: 2909,
        },
        {
          word: '重庆',
          count: 2973,
          user: 2155,
        },
        {
          word: '济南',
          count: 2457,
          user: 1691,
        },
        {
          word: '美食',
          count: 6080,
          user: 1641,
        },
        {
          word: '温州',
          count: 1899,
          user: 1486,
        },
        {
          word: '麻辣',
          count: 3515,
          user: 1046,
        },
        {
          word: '肯德基',
          count: 1823,
          user: 808,
        },
        {
          word: '长春',
          count: 8549,
          user: 806,
        },
        {
          word: '小龙虾',
          count: 2243,
          user: 628,
        },
        {
          word: '全家桶',
          count: 1951,
          user: 564,
        },
        {
          word: '拉萨',
          count: 699,
          user: 548,
        },
        {
          word: '北京',
          count: 4917,
          user: 545,
        },
        {
          word: '鸡腿',
          count: 1710,
          user: 506,
        },
        {
          word: '南京',
          count: 1709,
          user: 458,
        },
        {
          word: '送药',
          count: 5384,
          user: 344,
        },
        {
          word: '跑腿',
          count: 1224,
          user: 319,
        },
      ],
    }
  }

  render() {
    return (
      <div>
        <ul>
          {this.state.table.map((item) => {
            return <li key={item.user}>{item.word}</li>
          })}
        </ul>
      </div>
    )
  }
}

const EnHome = handleRenderTime(Home)
const EnAbout = handleRenderTime(About)

export default class App extends PureComponent {
  render() {
    return (
      <div>
        <EnHome copName="home" />
        <EnAbout copName={'about'} />
      </div>
    )
  }
}
:::
高阶组件的意义
我们会发现利用高阶组件可以针对某些 React 代码进行更加优雅的处理。
当然,HOC 也有自己的一些缺陷:
- HOC 需要在原组件上进行包裹或者嵌套,如果大量使用 HOC,将会产生非常多的嵌套,这让调试变得非常困难;
- HOC 可以劫持 props,在不遵守约定的情况下也可能造成冲突;
Hooks 的出现,是开创性的,它解决了很多 React 之前的存在的问题 比如 this 指向问题、比如 hoc 的嵌套复杂度问题等等
Portals 的使用
某些情况下,我们希望渲染的内容独立于父组件,甚至是独立于当前挂载到的 DOM 元素中(默认都是挂载到 id 为 root 的 DOM 元 素上的)
// createPortal是ReactDOM的API而不是React的API
render(){
  return ReactDOM.createPortal(this.props.children,domName)
}
案例:Modal
开发一个 Modal 组件,它可以将它的子组件渲染到屏幕的中间位置
::: details code
import { PureComponent } from 'react'
import { createPortal } from 'react-dom'

function Modal(props) {
  console.log(props)
  return createPortal(props.children, document.getElementById('modal'))
}

export default class App extends PureComponent {
  render() {
    return (
      <div>
        <Modal>
          <div>
            <h1>我是傻逼</h1>
          </div>
        </Modal>
      </div>
    )
  }
}
:::
fragment
在之前的开发中,我们总是在一个组件中返回内容时包裹一个 div 元素
使用 Fragment 后,无需向 DOM 添加额外节点
React 还提供了Fragment的短语法
它看起来像空标签 <> </>
但是,如果我们需要在 Fragment 中添加 key,那么就不能使用短语法
StrictMode
StrictMode 是一个用来突出显示应用程序中潜在问题的工具
与 Fragment 一样,StrictMode 不会渲染任何可见的 UI;
它为其后代元素触发额外的检查和警告
严格模式检查仅在开发模式下运行;它们不会影响生产构建
严格模式检查什么?
识别不安全的生命周期:
使用过时的 ref API
使用废弃的 findDOMNode 方法 : 在之前的 React API 中,可以通过 findDOMNode 来获取 DOM,不过已经不推荐使用
检查意外的副作用:这个组件的 constructor 会被调用两次( 这是严格模式下故意进行的操作,让你来查看在这里写的一些逻辑代码被调用多次时,是否会产生一些副作用 在生产环境中,是不会被调用两次的,在 react17 中 console.log 只调用一次)
检测过时的 context API:早期的 Context 是通过 static 属性声明 Context 对象属性,通过 getChildContext 返回 Context 对象等方式来使用 Context 的; 目前这种方式已经不推荐使用
render Props
RenderProps,顾名思义就是将组件的 props 渲染出来。实际上是让组件的 props 接收函数,由函数来渲染内容。将通用的逻辑抽象在该组件的内部,然后依据业务逻辑来调用函数(props 内渲染内容的函数),从而达到重用逻辑的目的。
renderProps 不是新的 API,而是利用 React 自身特点的编码技巧,演化而成的固定模式
import React from 'react'

class Cat extends React.Component {
  render() {
    const mouse = this.props.mouse
    return (
      <img
        src="data:image/svg+xml;base64,PHN2ZyB4bWxucz0iaHR0cDovL3d3dy53My5vcmcvMjAwMC9zdmciIHZpZXdCb3g9Ii0xMS41IC0xMC4yMzE3NCAyMyAyMC40NjM0OCI+CiAgPHRpdGxlPlJlYWN0IExvZ288L3RpdGxlPgogIDxjaXJjbGUgY3g9IjAiIGN5PSIwIiByPSIyLjA1IiBmaWxsPSIjNjFkYWZiIi8+CiAgPGcgc3Ryb2tlPSIjNjFkYWZiIiBzdHJva2Utd2lkdGg9IjEiIGZpbGw9Im5vbmUiPgogICAgPGVsbGlwc2Ugcng9IjExIiByeT0iNC4yIi8+CiAgICA8ZWxsaXBzZSByeD0iMTEiIHJ5PSI0LjIiIHRyYW5zZm9ybT0icm90YXRlKDYwKSIvPgogICAgPGVsbGlwc2Ugcng9IjExIiByeT0iNC4yIiB0cmFuc2Zvcm09InJvdGF0ZSgxMjApIi8+CiAgPC9nPgo8L3N2Zz4K"
        style={{
          width: '100px',
          height: '100px',
          position: 'absolute',
          left: mouse.x,
          top: mouse.y,
        }}
      />
    )
  }
}

class Mouse extends React.Component {
  constructor(props) {
    super(props)
    this.handleMouseMove = this.handleMouseMove.bind(this)
    this.state = { x: 0, y: 0 }
  }

  handleMouseMove(event) {
    this.setState({
      x: event.clientX,
      y: event.clientY,
    })
  }

  render() {
    return (
      <div style={{ height: '100vh' }} onMouseMove={this.handleMouseMove}>
        {/*
          使用 `render`prop 动态决定要渲染的内容,
          而不是给出一个 <Mouse> 渲染结果的静态表示
        */}
        {this.props.render(this.state)}
      </div>
    )
  }
}

export default class MouseTracker extends React.Component {
  render() {
    return (
      <div>
        <h1>移动鼠标!</h1>
        <Mouse render={(mouse) => <Cat mouse={mouse} />} />
      </div>
    )
  }
}
Render props 与 React.PureComponent 同时使用
如果在render方法中创建函数,那么使用render prop会抵消使用React.PureComponent带来的优势
因为每次调用render()进行渲染时都会创建一个新的函数,这将导致浅比较props的时候prevProps === nextProps始终为false
class Mouse extends React.PureComponent {
  // 与上面相同的代码......
}

class MouseTracker extends React.Component {
  render() {
    return (
      <div>
        <Mouse render={(mouse) => <Cat mouse={mouse} />} />
      </div>
    )
  }
}
在这个示例中,由于Mouse组件的render prop传输的函数是在render()中定义的,这将导致每次MouseTracker渲染时生成一个新的函数作为Mouse组件的render prop,因而抵消了继承自React.PureComponent的效果
解决方案
为了解决这一问题,可以定义一个实例方法传给render prop
class MouseTracker extends React.Component {
  // 定义为实例方法,当我们在渲染中使用它时,它指的是相同的函数
  renderTheCat(mouse) {
    return <Cat mouse={mouse} />
  }

  render() {
    return (
      <div>
        <h1>Move the mouse around!</h1>
        <Mouse render={this.renderTheCat} />
      </div>
    )
  }
}